MAGpie Part 1 - Attach Time Codes
Creating a MAGpie project
- If you haven't already, drag the "activities" folder from your CD to your computer desktop. This activity will take place in the "magpie" folder.
- Open MAGpie by double clicking the MAGpie icon. (On Intel Macs, this may take a long time.) You can click OK on the startup screen, or it will go away after a few seconds.
- After startup screen, choose menu item File->New Project. This should open the Project Properties dialog box (here it says "Open New Project").
- In the "Base Media" area of the dialog, click "Browse" to find the QuickTime video file, "ahg2007.mov". Look in the "activities" folder, then in the "magpie" folder. (Look in the Activties folder that you dragged to the desktop, not on the CD.
- Set the Segment Annotation Style to "Underline segments." For now, leave the other settings as they are.
- Click OK to save the Properties. The "Create New Project Track" dialog should appear.
- Leave the default for an "English (United States)" caption track and click OK. The video window should appear (the first frame of the movie is the title frame, "Accessing Higher Ground 2007 - Video Captioning Demo").
- Choose menu item Captions->Insert Captions from file to open a dialog box. Select file "ahg2007_captions_raw.txt" and click OK. The caption text should appear in the MAGpie working window.
- Save the project (menu File->Save) in the "magpie" folder with the file name "ahg2007".
- Wait for presenters to describe the MAGpie interface (see below).
![[MAGpie screen shot]](resources/magpiescreenshot.jpg)
Inserting time codes
- Make sure the first (empty) line of captions is highlighted (if not, click on the "1" in the Row column). Press the F9 key to insert 00:00:00 as the start time for the first caption to make the row 1 caption visible at the start of the video.
- Click in the blank box in row 1 in the Caption column. Type in your personal captioning credit: "[Captioned by your name here]."
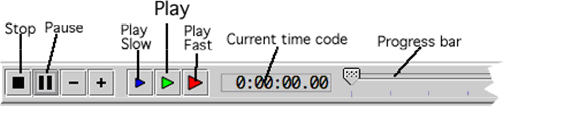
- Be ready to begin video playback using the play button. See the graphic below. For now, use the GREEN play button, the middle of the three play buttons. (Or if you prefer, you can use the F6 key to play and pause the video.)
- Highlight line 2 by clicking on the 2 in the Row column.
- In a moment, you will play the video and press the F9 key to insert time codes into the Start Time column for the matching caption while the video plays. MAGpie automatically moves the active area to the next caption in preparation for the next F9 keypress.
- The timing takes a little getting used to. You should aim for pressing the F9 button at about the moment the speaker begins to speak the text that displays in the Caption column. (For older computers and some Intel Macs you may experience a long lag between pressing the button and the appearance of time codes. Just keep pressing the button when it's appropriate and ignore the lag.)
- Begin video playback using the green Play button and press F9 at the start of each caption.
- Play the video to the end and insert time codes for each caption. For now, don't stop the video unless you completely mess up and want to start over. (To start over, click the Stop button, highlight row 2 of the captions, and start at step 5 above.)
- When you reach the end and the video stops, press the F9 button one more time to embed the last time code into the last line, which should be blank.
- Save the project.
You will be inserting caption sync points, or time codes, into the Start Time column using the F9 key (note: the F9 key may be assigned to a different function by the operating system).
Editing your time codes
- To make sure your captions will show when you replay the video, select Playback->Export changes now.
- Select the caption line to edit by clicking on the number of the row in the Row column.
- Use the slider in the Progress bar to reset the video to the first frame or to a spot in the video that you want to edit.
- As you play back the video, press the Pause, - (minus), and + (plus) buttons to stop and move the video to the frame at which you want to set a time code.
- Once you've adjusted the video to match the start of the caption you highlighted in the last step, press the F9 key to set that caption start time.
- Save the project.
To erase a caption from the caption area
- Option 1. Play the video to the frame where you want to erase the caption, pause, select the caption row you want to erase, and click the F10 button to insert a time code into the End Time column.
- Option 2. Play the video to the frame where you want to erase the caption, such as the "[Applause]" row (row 3), pause, select the caption row you want to erase, select Captions->Insert new row below selected row, which creates a blank row, select this new row if it isn't already selected, and press the F9 button.
- Test your changes by selecting Playback->Export changes now and playing the video.
- Save the project.
While the video is playing, if you want to get rid of a caption without showing the next caption in the sequence, as in situations where the video is playing no sound for an extended period, you have two options:
MAGpie Part 2 - Export Files
For QuickTime:
- Choose menu item Export->QuickTime SMIL 1.0 format.
- If all goes well, you should get a dialog confirming export of both QuickTime text file and SMIL file. Note the save location. It should be in the folder where you saved your project (probably the "magpie" folder). The captions file name will be called "ahg2007.en_US.qt.txt" (don't confuse this file with the temporary file "temp.en_US.qt.txt" used by MAGpie) and the SMIL file will be called "ahg2007.qt.smil" if you used the project name suggested above. Click OK at the dialog box.
- If you get "Export Error" you probably have a time code out of sequence.
For DFXP (optional):
- Choose menu item Export->Adobe Flash - W3C DFXP format.
- If all goes well, you should get a dialog confirming export of both QuickTime text file and SMIL file. Note the save location. It should be in the folder where you saved your project (probably the "magpie" folder). The captions file name will be called "ahg2007.dfxp.xml." Click OK at the dialog box.
- If you get "Export Error" you probably have a time code out of sequence.
For Windows Media Player (optional):
- Choose menu item Export->Windows Media Player - SAMI format.
- If all goes well you get a dialog confirming export of the SAMI file. Again, note the save location. The SAMI file name will be called "ahg2007.smi" if you used the project name suggested above. Click OK at the dialog box.
- If you get "Export Error" you probably have a time code out of sequence.
You can now open the exported files using a text editor (i.e., drag the file and drop it on the WordPad icon in Windows; don't double click the file). You can also navigate to the folder where you saved your project file -- the "magpie" folder in the activities folder. Look at the Index page for the workshop CD. You can compare your output files with the MAGpie output files under Demonstration on the Index page. Compare files "Caption file for QuickTime," "DFXP file for CC for Flash," and "SAMI file for Media Player."